BP17 Machina Abyss Guide
How many Garnets can we fit in this deck?
Garnets and Searchers, Which Game is this Anyway?
Machina Abyss, introduced in BP07: Verdant Steel, was a combo archetype that tries to use to push huge bursts of damage. It may seem daunting to try to continually push out a full board but the deck contains a large number of Assembly Droid token generators and some very powerful resource loops in the form of and . All of these pieces made this one the strongest and most popular decks in that format, although the fall-off would be pretty severe in the follow-up sets, as the meta shifted to faster or more resilient decks. BP12 would introduce a few tools for this deck but would fail to propel the deck back into its former limelight due to the aggressive nature of the metagame. But now we've been granted the technology to rebuild this archetype, making it harder, better, faster, and stronger than ever before.
Sample Decklist and Cards Explained
Without further ado, here is a sample list:
Loading main deck...
Loading evo deck...
That's right: 38 Machina cards and 2 pieces of non-Machina removal. The core game plan of this deck is fairly simple - build a full board and activate either or both versions of Mono and push face damage. The journey there is what will separate the hobbyists from the dedicated clanker enjoyers though. With that in mind, let's go over the cards:
-
: 2pp Mono is still the big shot boss monster of this deck, but she no longer has to be the only Storm attacker. Her is why this deck is generally about threatening to make a full board. Keep in mind that she can only generate an before she evolves. She's still the main source of damage calculations, but between Super-Evolution and her , the damage ranges have increased by a good amount and the targets are easier to hit. Don't forget that she needs an to activate her buff effect when evolved.
-
: After her imminent death is solved by nature magic (it's a lore thing), 3pp Mono loses her ability to evolve but gains a potent removal effect on Strike. Her ability to immediately attack is still tied behind having a full board of Machina though, and she still has the ability to generate an immediately. This new Mono is what gives Machina Abyss grind game and importantly allows the deck to keep up in a metagame where every deck is running must-clear followers.
-
: Mono's signature attack and the most feared of this deck's win conditions. You want to get this into your cemetery to enable activated ability. The modes on this card are both quite potent.
-
: The best rate on extra bodies for this deck and a powerful reach tool, both modes are very valuable in this deck. Consider that between summoning and this, you can make 4 bodies for 2pp. This means you can activate Mono's effect as early as turn 5 going second from an empty board.
-
: Future restriction target and it's not too hard to see why - 4-cost Aenea gives Machina Abyss incredible amounts of consistency for a deck that needs access to specific cards to win the game. She's also one of your key defensive tools - not only does she offer healing, she makes an almost insurmountable wall that can buy critical turns in certain situations. Some search targets to consider are:
- : Fill your board and chip while removing a target.
- : Get 2pp Mono in rotation if you have but not her.
- : For value or recurring specific cards in the cemetery
- : Searching a 1-drop might feel bad but this can be a very potent defensive setup
-
: 2-cost Aenea has not only the ability to evolve, but also the ability to Super-Evolve, which gives the deck another form of recycling. Summoning is really important for keeping resources up while pushing a board and the Super-Evolution naturally synergizes with in order to push damage and keep the opposing board down, but notably can retrieve any Machina card, just putting it into EX and applying a 3pp discount.
-
: 1pp 1/3 ward is an incredible rate and one of the best 1-drops in the deck. Note he also only takes one damage at a time as long as is on the field, and if there's one on the field, he can be summoned from the cemetery, for 1pp, after which he'll be banished upon death.
-
: Companion card to . His statline is similarly very powerful as above, but his fanfare is also quite incredible, since you're basically drawing a card and sometimes the buried card is effectively drawing a card or represents crazy tempo. The craziest high is adding while burying , but fueling both the hand and cemetery is generally good to do.
-
: We've cut , but 3-cost Nicola is still a powerful source of recursion and resource generation in the deck. He does offer a same-turn discount on the card he pulls back on evolve, but sometimes, you'll want to save it for another turn.
-
: 2-cost Nicola is effectively a replacement for that also comes with a body. When summoned off of his previous incarnation he'll also gain assail. Watch your trade order - his Rush/Bane is a static effect and can go away if he's left alone.
-
: The OG 1-drop for this deck and still one of the best cards to see in your opening hand. We really value the Last Word “rummage” effect since it can both increase your tempo, such as by putting into your cemetery for and provide consistency by discarding redundant cards to dig for specific ones like Mono, Aenea, or Alpha Drive.
-
: A really potent board builder and the replacement for . Notably a two-card combo to activate . This is your only source that doesn't come at opportunity cost, which are your only healing alongside Aenea, so keep that in mind when calculating critical turns for what your opponents' damage output can be.
-
: Both modes on this card are incredibly powerful. This deck has many followers that play specific roles so knowing the correct search target is very important. The second mode to pay 7 total to summon 3 followers from the deck is really powerful too, but usually requires an evo point or extra play point to fully convert. Also keep in mind what's left in your deck when you go to use this mode. The "bread and butter" play will be 2x Immortal Garnet + Garnet Rebel for 11 damage, but there are other iterations on this.
-
: A tech card that will pick up in usage after is restricted to one copy. There are numerous combinations that this card can be used for but the main thing is that it's a single card that can generate nearly a full board, which helps with the efficient nature of the deck. The cemetery is already effectively a second hand for this deck, but playing this card reinforces that idea and rewards being cognizant of what is in your cemetery.
-
: Practically the only non-Machina card worth consideration for inclusion - a very powerful removal tool that also cuts down the damage you can potentially take even when not clearing its target.
Game Plan and Strategic Considerations
Machina Abyss kind of has a twofold game plan. Plan A is to all-in on extremely early, i.e., before turn 6, and present an unclearable board and a huge chunk of damage. Plan B is to chip away at the opponent and clear the game with a few bursts of damage from hand, the key breakpoints being 8 for + and 12 for those two with an activation of Garnet Rebel's Alpha Drive effect.
To get into the specifics, both of these plans require 5 Machina followers on the board, which is why we only play Machina followers. While I did emphasize that chip damage matters, it's important to consider when you do and don't attack in order to help ensure that you get a full board as quickly as possible, since standing followers can be more difficult to remove, and despite removal being very commonplace in the current metagame, our deck has enough recycling to outlast removal.
I recommend thinking about each board space as costing 1 play point (with some evo point cheating), and both variants of Mono come with a free body, meaning you need 3 more bodies to activate their respective ways to access Storm. Then there are some special discounts - reanimating a 2pp Mono and with that Mono in play are both ways to get 2 bodies for one play point. Then you should count the damage, usually over a couple of turns. 2pp Mono is 5, 3pp Mono is 3, and then if you activate the Alpha Drive buff it's an extra 2 every board space you can attack with on top of what you have in that board space. So let's take an example:
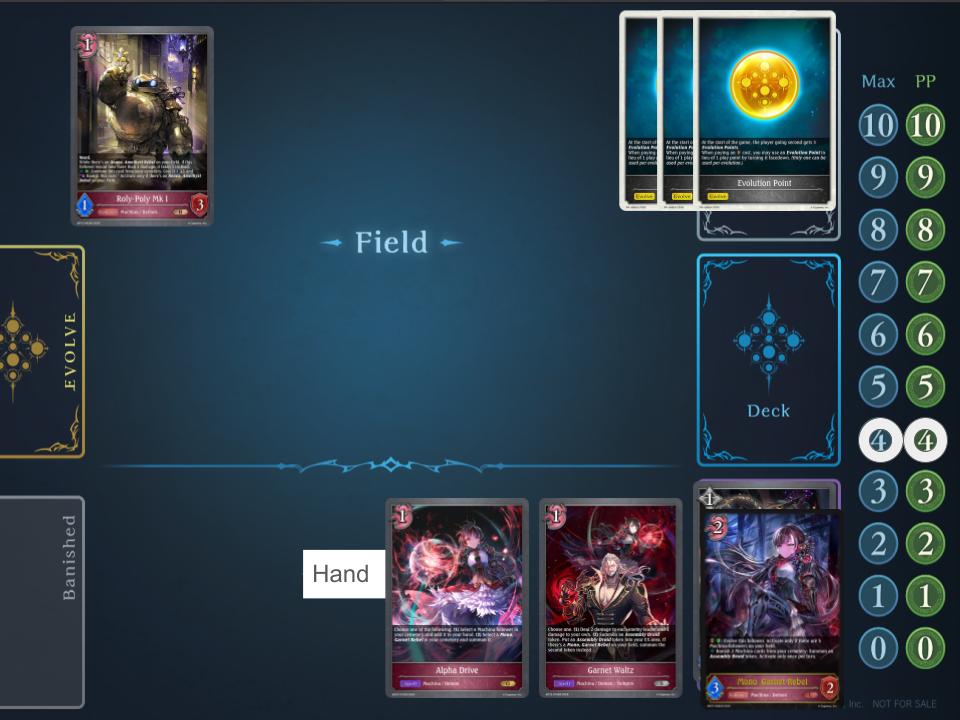
I cherry picked an example to show how terrifying this deck can be. We are on turn 4 going second and has survived our opponent's removal suite. We have in the cemetery (let's assume we discarded her to ), and and in hand.
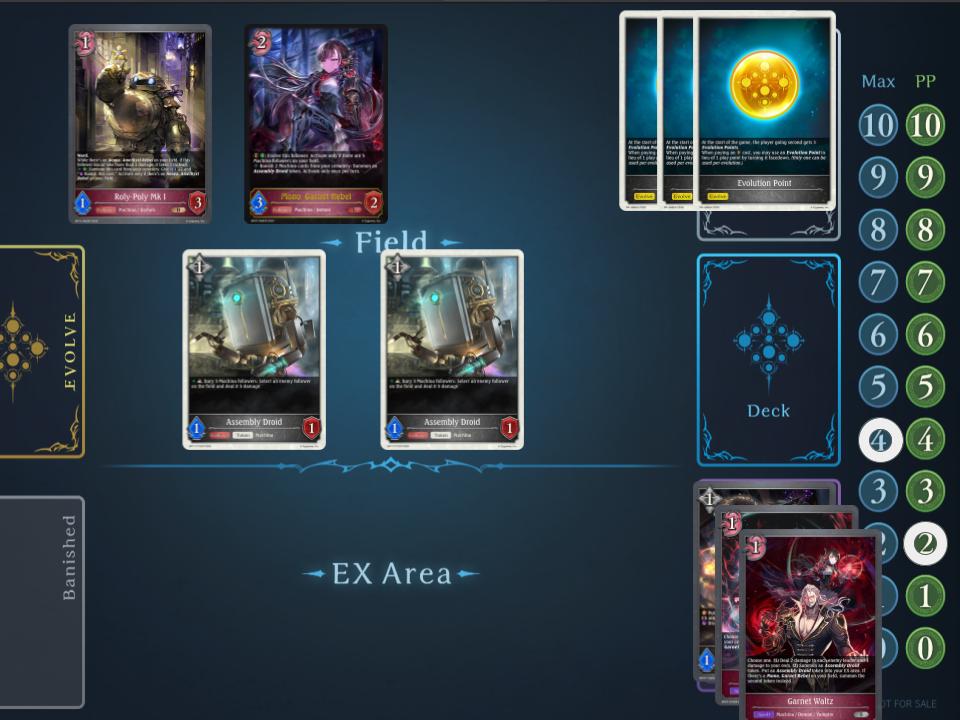
Play , summoning to the field. Play . Because is on the field, it will summon two tokens.
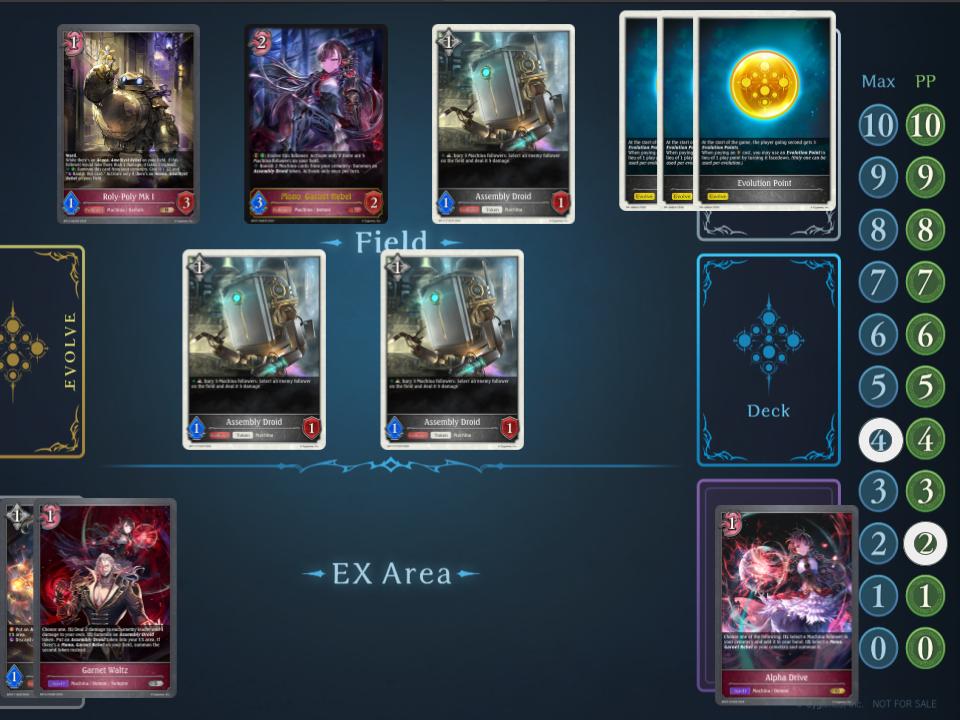
Activate Mono, Garnet Rebel, banishing Garnet Waltz and Mechagun Wielder in order to summon another .
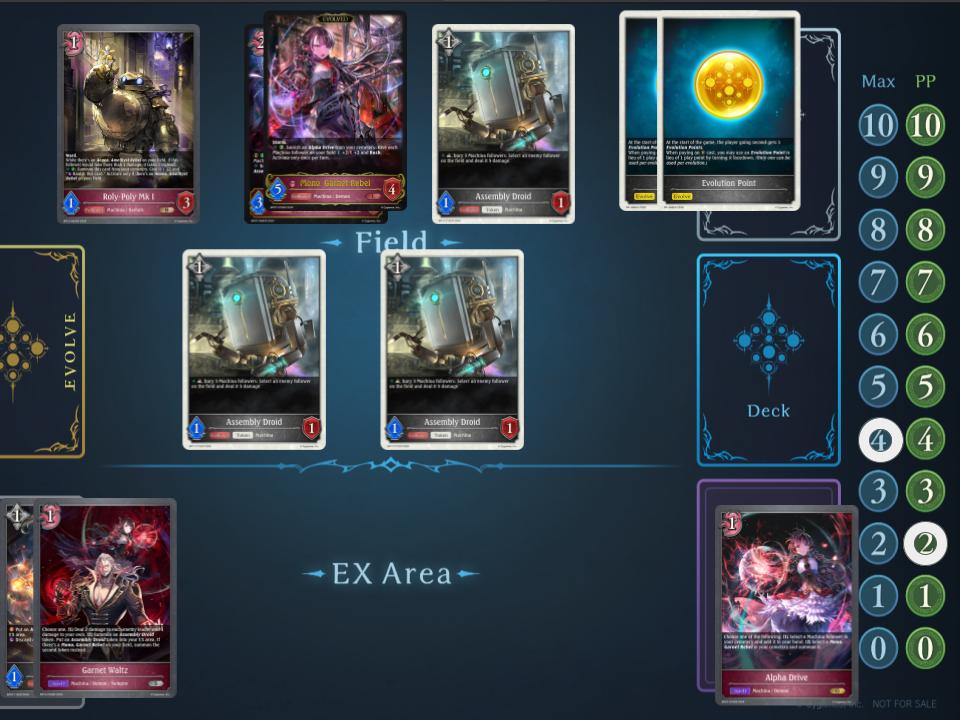
Use an Evolution Point to evolve Mono, Garnet Rebel. We still have 2 play points left, which means we can...
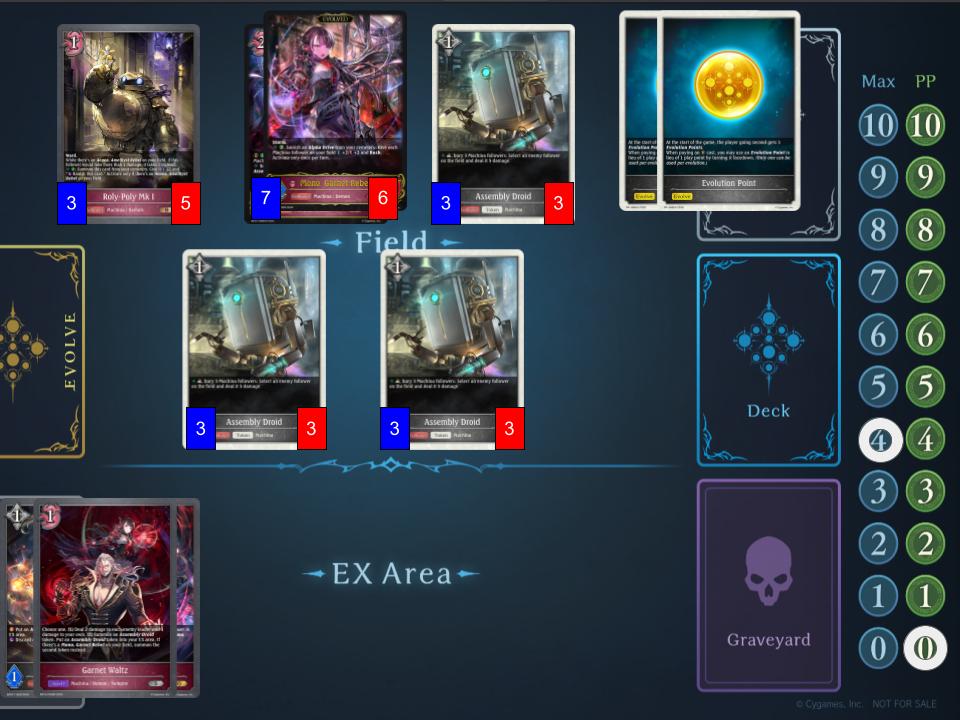
Activate , pay 2pp, banish the Alpha Drive we played, buffing our entire board, with the option to immediately connect for 10 damage (7+3).
Something to consider is that sometimes it's best not to attack. If you use Alpha Drive to buff a board but only Mono can attack, it's sometimes worth not attacking at all, especially if your opponent has a clogged board. Your whole board can represent 19 or 20 damage, while your opponent may not have lethal damage on the spot. This puts a lot of pressure on your opponent to have removal, and given that removal is often tied to followers, well, it can make the difference between winning and losing in a low resource hand.
Here's an example showing the damage potential in this deck thanks to Steeled Hopes:
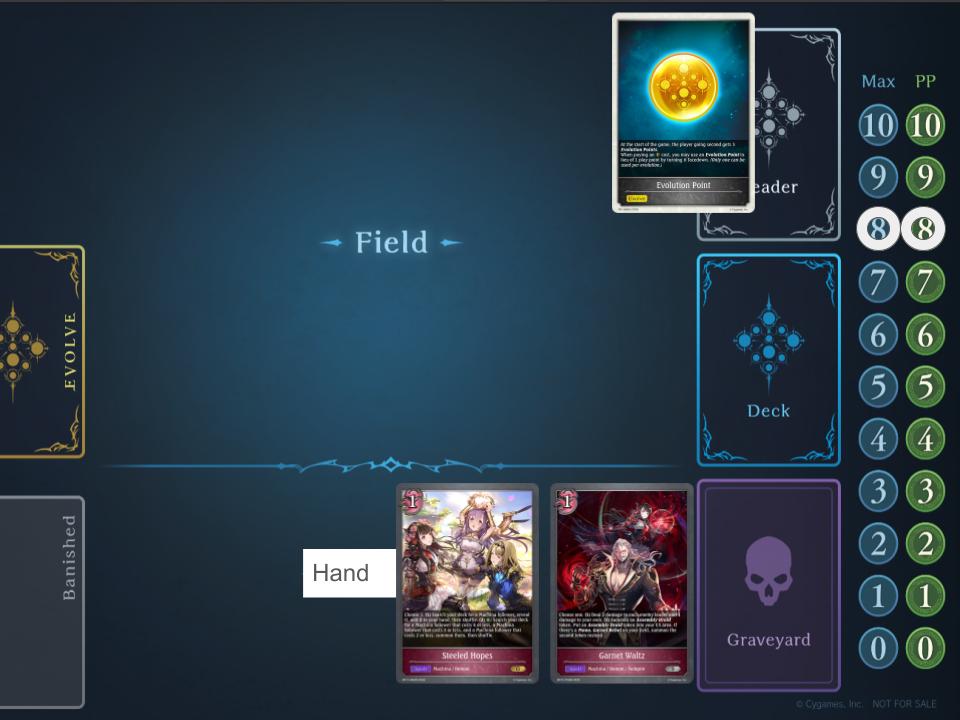
We have and in hand, how much damage can we do?
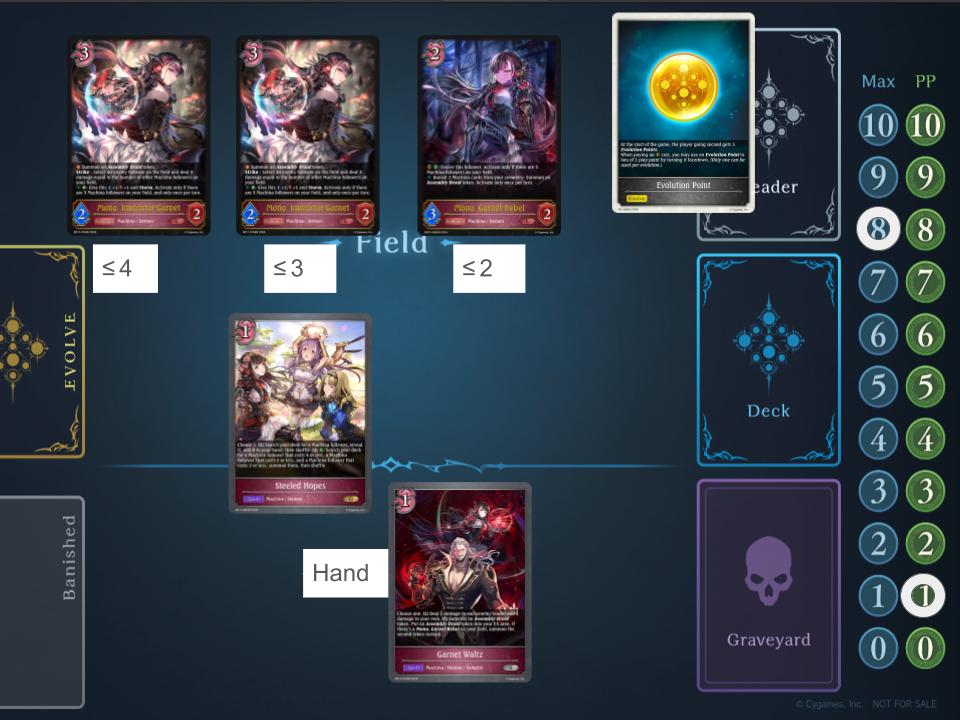
Play Steeled Hopes for 2 copies of (4 or less and 3 or less) and 1 copy of (2 or less).
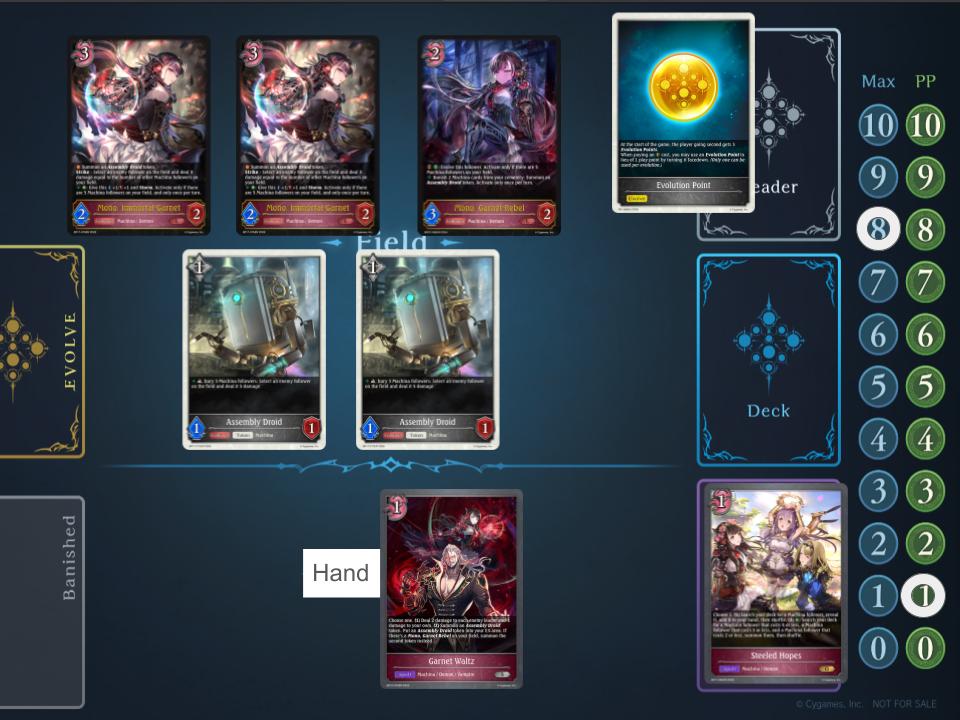
Resolve fanfares.
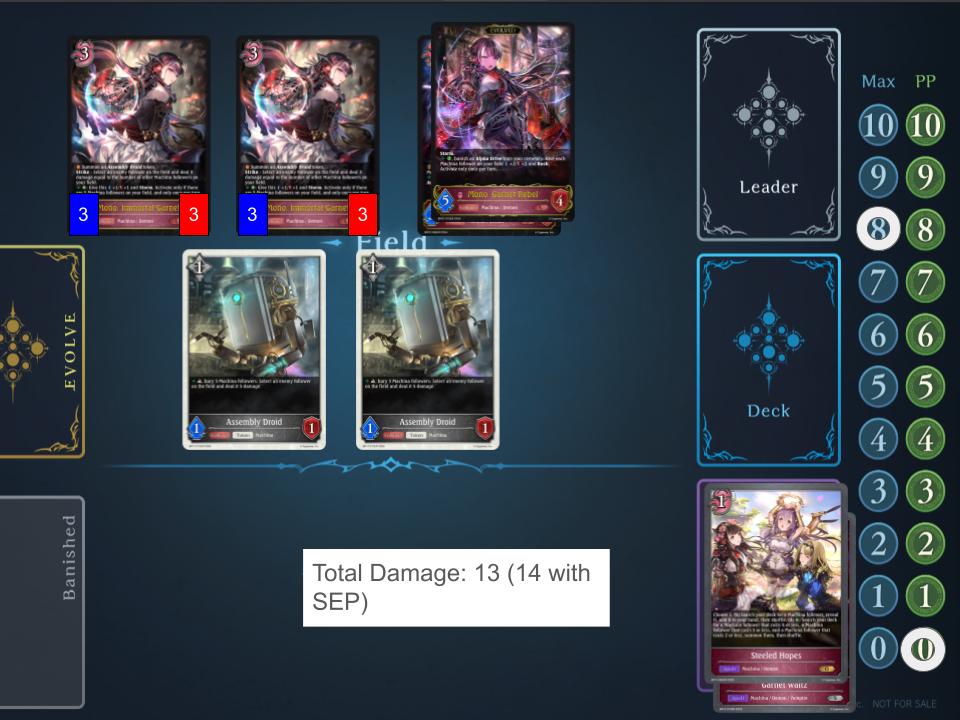
Activate , evolve into and then play Garnet Waltz for 2 more damage.
With that in mind, our game plan is to do the following:
- Fill the board
- Chip and/or set up big bursts of damage
- Recur your damage and setup pieces
- Don't die first while getting your damage done
We've talked a lot about how we're trying to push big boards but keep in mind that there are a lot of followers that must be removed nowadays. To this end we have , , and the engage effect of . You also have both for wards and healing from and to try to outlast your opponent in a race scenario. Another note to keep in mind is playing against decks with banish effects. You can access from the cemetery, but not from banishment, so it can be worth it to use Assembly Droid to bury Mono to keep her in rotation.
Mulligan
Given how many roles each piece in this deck can play and the speed with which you're looking to execute the all-in plan for this deck, a proper mulligan is vitally important. Keniwo, one of the foremost Japanese players in understanding this deck, breaks down mulligan priority as follows, and I haven't found anything to contradict this in my experience:
- One Drop Followers. In order to threaten or as soon as possible, you need as many bodies as possible on your field. Therefore, having a 1-drop follower is vitally important.
- Resource-generating cards - this means cards that give you good value and/or cards that represent multiple bodies. is the premier card for going wide, especially when going second, while and are great cards for keeping your resources flowing.
- Charge! Ok I borrowed the keyword here from another game but we need this for the sake of the mnemonic here. This means a plan to activate either Mono, depending on the matchup. Immortal Garnet is generally the more flexible card, but some matchups demand you go for Alpha Drive as soon as possible, which leads to
- is a uniquely unsearchable card in this deck that we need in order to make the most unfair boards for which this deck is feared. This means that with all your other needs met, having Alpha Drive in hand is huge for making your hand that much more explosive.
So if you want a silly little mnemonic or acronym remember ORCA. One-Drop, Resources Charge!, Alpha Drive. That's what we're looking for in our mulligan, in that priority order.
Specific Matchups
Once again, I'll be relying on Keniwo's insight for part of this, peppered with my own experiences and observations.
 Combo Forest - Even
This matchup can be very volatile, especially if they're teching . You'll want to go second for a variety of reasons, the most obvious of which is how AoE effects can line up in this matchup, but don't overcommit to go wide and just put yourself in a losing state. Threatening the Forest player can slow down their development as well, so be ready to play the grind game - if they're just playing AoE's, it's a bit harder for them to sculpt their hand. Do be cognizant of your health - Combo Forest still has a pretty dangerous lethal range.
 Machina Rune - Even-ish
While both decks have power plays when choosing to go second, this matchup is actually about going first. This leads to an attrition-style game where is used to clear and . They have a lot of removal but it is gated around specific cards, so keep pressure up with wide boards. Look out for all their quick interaction with a surviving Tetra, and make sure you don't get your 3pp Mono sniped by 's Last Words. This matchup can be pretty grindy, so don't commit too hard hoping for your opponent to not be able to out your setups. Because of how the removal from Machina Rune works, both version of Roly Poly will be very powerful in this matchup.
 7c Dragon - Favored
We've all heard it enough at this point, that Dragon is weak to aggro. However, with Apollo, , and it's not always easy to establish a big board for Abyss. Still, paradoxically, we'll still want to choose to go second in this matchup. Apollo is one reason here, once again, but also it has to do with how Mono's full board lines up with evo points. Assuming the Dragon player doesn't have a free turn to ramp, turn 5 going second is the first power play for both decks, and if you make an Alpha Drive board, Dragon is going to struggle to play into it.
 Machina Abyss - Even
This is obviously going to be an even match, but paradoxically, this is a matchup where you'll want to choose first. While it's true that the second player has access to more explosive hands, the first player has access to and first, and both of these make for a much more consistent game plan.
Departed Abyss - Favored
You'll want to choose first in this matchup. Mono on 3 is going to be really good at pushing damage while keeping Departed from developing to the board. In addition, practically the only out to turn 3 going first is , so if you play it into an open board, it can't be cleared. Take advantage of damage when you can get it and play to try to end the game before Super-Evolution, or consider making a full standing Alpha Strike board on 6. Look for chances to get chip damage in, since you don't want to give Departed too much time to stabilize (they can do some insane healing numbers on ).
 Machina Haven - Favored
Machina Abyss is definitely the more consistent deck, but one pattern to consider in this matchup is the ability to lock the board. If they hit an early Augmentation Bestowal and make a huge board, you'll want to consider whether you can try to play an attrition game or whether you'll go with for to block off their board, which will make it hard for them to push damage, and then you can build up an Alpha Strike board behind this.
Wasteland Haven (and similar Aggro decks) - Slightly Unfavored
Aggressive decks that can continually chip away at your board are pretty rough to face. Machina Abyss's strengths are pairing a grind game with the ability to explode into huge boards when not handled. However, decks that can consistently keep Machina Abyss off a full board while also pressuring health total can be a problem. The defensive power of can shine in these kinds of matchups, and don't hesitate to use Assembly Droids to remove problem followers.
Conclusion
I'm admittedly not a firsthand expert on this deck, but hopefully I've convinced you that this deck is powerful and has a fair amount of depth to grasp. I mentioned Keniwo a few times in this guide so I'll link his original article in Japanese for BP18 here. Huge thanks to my locals who I bullied while watching them play and talking over lines.